How to Organize a Nursery Dresser: From Top to Bottom
This post may contain affiliate links. As an Amazon Associate, I earn from qualifying purchases at no extra cost to you.

As a first-time mom, you’re probably wondering how to organize a nursery dresser. What to store in each drawer? And which organizational systems will actually work best?
I had the same thoughts when I was in the process of organizing my son’s nursery dresser drawers for the first time. Now that I’ve gained some experience, I’m excited to share my tips for organizing a nursery dresser.
A great changing station dresser is functional and well-organized. It should be organized to make your daily routine easier. While also being structured to grow and evolve with your child as they grow.
Think of the nursery dresser as the command center of the whole nursery. It’s where you’ll spend a lot of time changing diapers, outfits, and handling so much more. With everything you need at your fingertips, it becomes the ultimate hub for all things baby care.
What Nursery Dresser Should you Purchase?

There are so many nursery dresser options nowadays. It can be difficult to figure out which one to purchase. I definitely recommend buying a larger dresser if it fits in your nursery. It will grow with your child and serve you longer.
Nursery dresser style and color are definitely personal choices. Take a look at the picture on the right to determine what size dresser makes sense for your nursery.
Our nursery dresser is a full-size double dresser (the green dresser seen in the photo to the right). The top has the perfect amount of space for a changing basket and a small diaper bin with essentials. It also has six drawers that store plenty of baby items. We love our nursery dresser and can’t wait to continue to use it as he gets older.
Dressers certainly come larger in width and smaller than what we have. You’ll need to measure the space where you plan to place your nursery dresser. This will help you determine what size dresser is right for your room.
Think of Your Nursery Dresser Routines
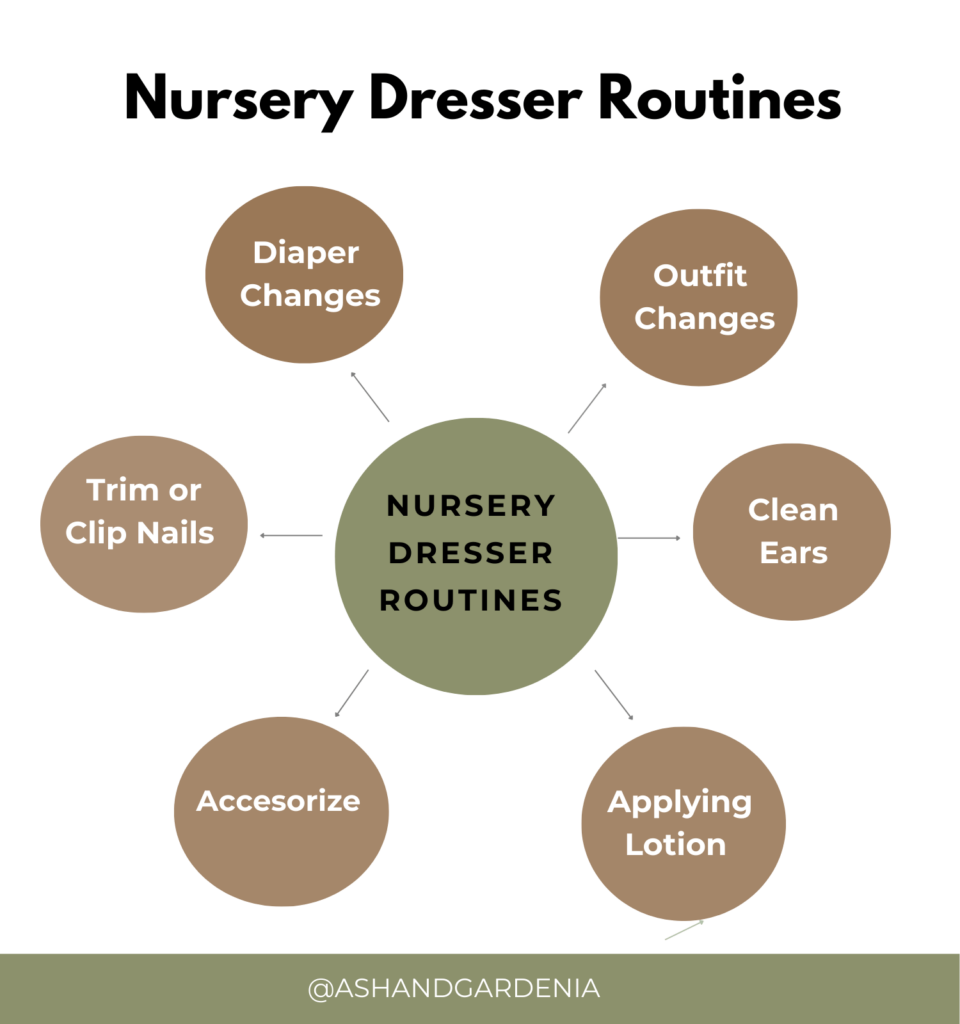
When organizing a nursery dresser, start by thinking about your daily routines. Consider what tasks you’ll be doing most often at the changing station and what items you’ll need within reach. Routines may include dressing and changing your baby, along with basic care tasks. You might also add accessories like bows, hats, socks, and shoes during these times.
Once you figure out your daily routines, you can plan out your dresser drawers to match. Here’s a simple breakdown:
- Baby Care = Baby Care Item Drawer
- Changing Diapers = Diapering Drawer
- Outfit Changes = Clothing Drawer
How to Organize a Nursery Dresser From Top to Bottom
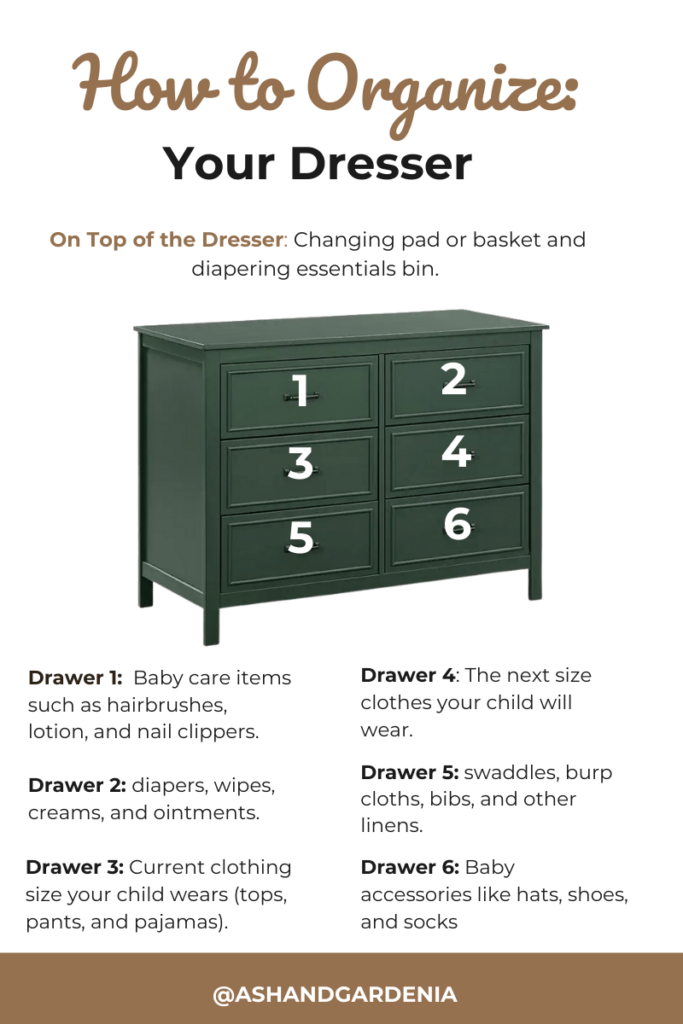
Top of the Dresser: On top of a nursery dresser, you will need a changing pad or basket. I love my diaper-changing basket, which comes with a pad insert. If you’re not into the basket look, here is a wipeable changing pad that I also love. I also store all my diapering essentials in this beautiful seagrass diaper caddy right next to the diaper-changing basket for easy access. When the bin runs low on diapers or other essentials, I just replenish the stock from my diapering drawer.
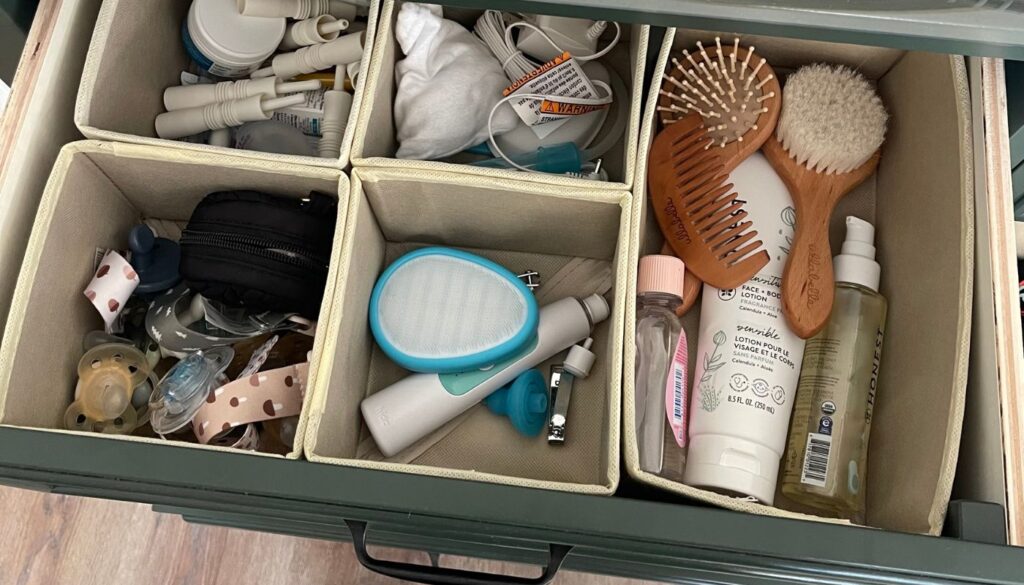
Drawer 1:
I put all my son’s baby care items in the first drawer. These are the things I use while getting him dressed, like baby lotion and oil. I really love this lotion because the ingredients are so clean. I also store my son’s nasal aspirator, nail clippers, brushes, pacifiers, and some baby medicine in this drawer.
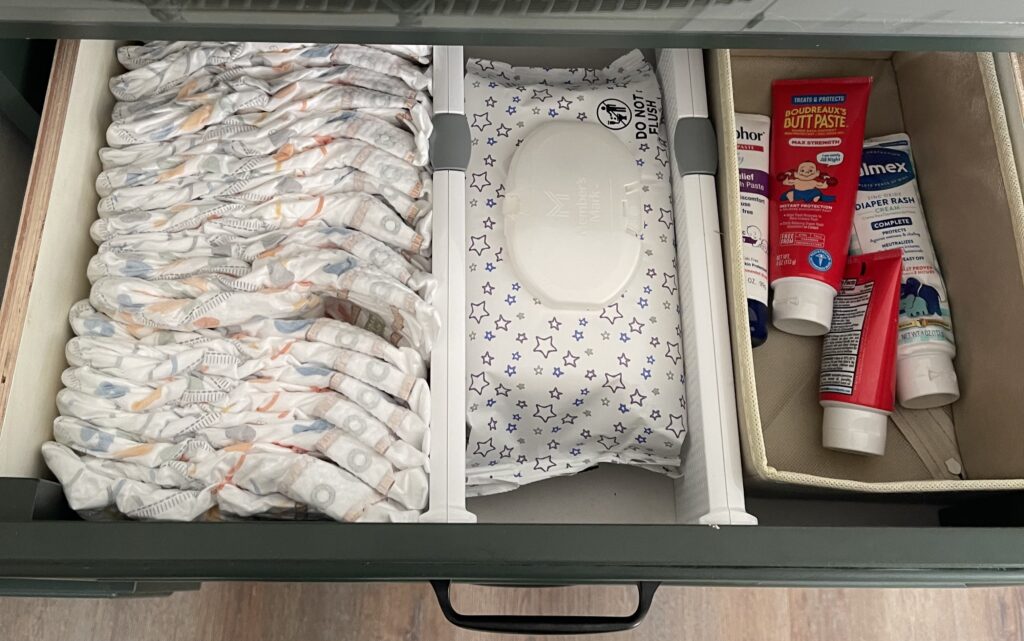
Drawer 2:
This drawer is near the diaper-changing basket. I thought it would be best to store extra diapers, wipes, and diaper creams here. I use this drawer to restock my top of dresser diapering essentials bin. If I ever forget to restock this bin, I have diapers and wipes ready to be used.
Drawer 3:
Baby clothes is my next essential for drawer three. In this drawer, I store my son’s current clothes that he fits into. I use dividers to organize clothes by type: onesies and tops, then pants, and finally pajamas. Each section is separated by a divider to keep everything tidy.
Drawer 4:
In this drawer, I store clothing my son would fit into next. I use dividers to organize them, following the same system as in drawer three.
Note: When my son outgrew the clothes in drawer three, so I removed these clothes from drawer three and put them in storage. Then I moved his current-size clothes from drawer four into drawer three. And updated drawer four with the next size clothes he would grow into.
Drawer 5:
I store swaddles, burp cloths, cloth bibs, and my extra Boppy pillow covers in this drawer using cloth drawer bins. I really love our muslin burp cloths. We totally went overboard with the number of burp cloths, bibs, and swaddles we have. We probably had ten swaddles and only used 5 of them. Not only that, but we also had about fifteen cloth bibs and have only used six of them. Try not to go overboard in this area. It can be difficult to fit everything in your dresser or nursery if you have limited space.
Drawer 6: In the last drawer, I kept baby accessories organized with three cloth bins. One bin held socks, another stored shoes, and the final bin contained hats.
More Tips on How to Organize a Dresser:
- Your dresser might be different from mine. It could be longer, have more drawers, or have fewer. Still, you can use this layout as a helpful example.
- If you have too many clothes, you can hang outfits and other clothes in the closet.
- Blankets take up a lot of drawer space and are not needed daily. See if you can store them in a floor storage bin or in a closet bin.
- If your dresser is smaller than mine, you can store burp cloths, swaddles, and bibs elsewhere. They aren’t essential at the nursery changing station. You’ll mostly need burp cloths and bibs during the newborn stage. If you’re often in the living room, keep them nearby for easy access.
Dresser Organization Tools:
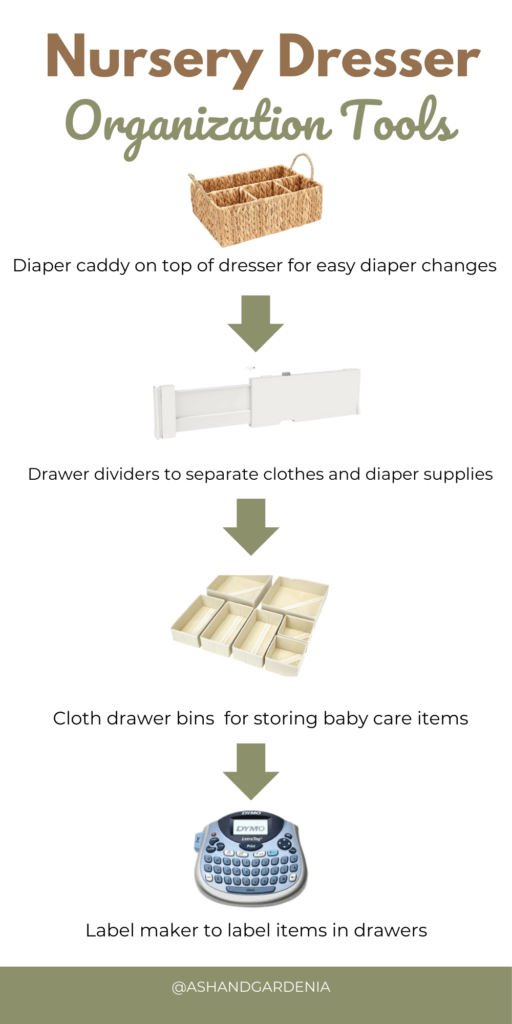
Diaper Caddy
Be sure to get a diaper caddy that goes right on top of your dresser. It’s great for grabbing diapers and creams quickly for diaper changes. I like this wicker diaper caddy because it has so many compartments. If you’re not liking the wicker look, this vegan leather caddy I recently just bought for my next son, and I’m in love. It’s stain resistant and comes in several neutral colors.
Draw Bins
Drawer bins help you keep like items grouped together within a drawer. This prevents things from being sprawled out and messy. I use these cloth drawer bins, and they fit my drawers perfectly. You could also go with clear plastic drawer bins too.
Draw Dividers
Drawer dividers help separate larger items into categories by separating the drawer into sections. I use these white drawer dividers that are adjustable, and when locked into place, they do not move at all. I also like the look of these clear dividers as well.
To Label or Not to Label:
Many posts will tell you to label everything in your dresser drawers. If it helps your brain, then do it. I didn’t do it because when you open the drawer, you can literally see everything. If you label clothes by size, you’ll need to relabel them as your child grows. This can become a frequent, annoying task. However, labeling does come in handy when you label bins or items where you cannot see what is inside. This label maker is great! I use it for many projects in my house.
How to Maintain Dresser Organization Over Time
Keep Everyday Items Accessible
I highly recommend storing everyday essentials in the top drawers of your nursery dresser. These drawers are easiest to reach during diaper changes or busy mornings. Items like diapers, diaper creams, and daily outfits should be kept here for quick and convenient access.
Restock your drawers:
Take inventory of the items you are running low on in your dresser drawers. Restock these essentials, such as diapers and wipes, as needed to stay prepared.
Keep Items Grouped By Category in Drawer Bins
Keeping items grouped by similar qualities will make it easier for you to find items quickly. If you just throw items back in the drawer, it might be difficult to find items.
Create a Routine for Clothing Rotation
Remember to switch out your child’s clothes as your child gets bigger so drawers do not get overstuffed. I use one drawer for clothes my son is currently wearing and another for the next size up. When he outgrows his clothes, I rotate them and store the old ones in a bin in the attic.

Roll Clothes instead of Folding: Rolling baby clothes instead of folding them helps save space in the drawer. It also prevents creases in the clothes.
Use the “One In, One Out” Rule
For every new item of clothing you receive or buy, remove an older one that no longer fits or is in poor condition.
Every four to six months, clean out all the drawers
This involves taking everything out of the drawers and assessing what your child has outgrown. You’ll also want to decide what can be thrown out and what’s worth keeping in the dresser. Recently, a spring clean-out of my son’s dresser revealed just how many items could be stored away or tossed now that he’s older.
Conclusion
Thanks for reading! I hope you found this post on how to organize a nursery dresser helpful. Nesting and organizing before your baby arrives can feel overwhelming, but my goal is to make it easier for you. If you enjoyed this post, take a look at some of my others.