Improve Your Kitchen with a Free Kitchen Zones Organization Chart
This post will help you organize your kitchen using a free kitchen organization chart based on 8 functional kitchen zones.
The kitchen is the central hub of the home, and when it is cluttered, disorganized, or not functioning properly, it can affect the entire household. An unorganized kitchen leads to wasted time, frustration, and unnecessary stress. Using a zone-based kitchen method organization system helps everything have a clear purpose and place.
This is a proven method recommended by professionals like the National Kitchen and Bath Association because it improves kitchen workflow and efficiency.
If opening your cabinets makes you feel overwhelmed, you’re ready to get the chaos under control, or you’re simply looking to improve your kitchen flow, this post is for you.
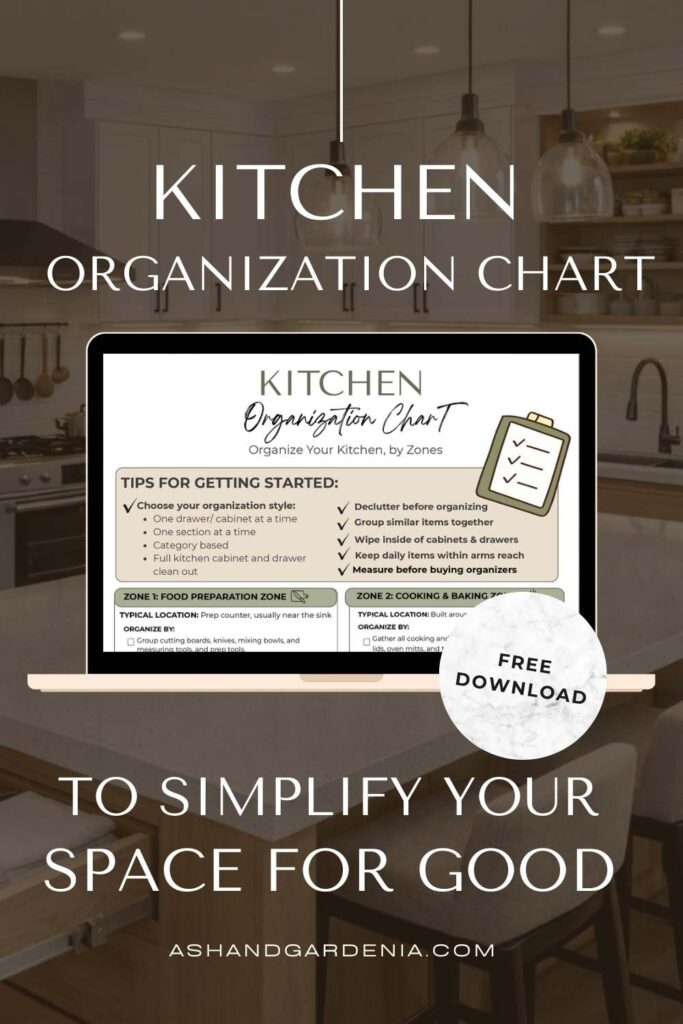
I have created the ultimate kitchen organization chart to help you organize your kitchen by zones and categories. This chart shows exactly where to start, how to set up a functional kitchen that fits your lifestyle, and how to create organization systems that actually last.
Important Tips Before Using the Kitchen Organization Chart
Before we dive into the kitchen organization chart and how to use it, let’s talk preparation. Organizing your kitchen is a big project, and having a plan in place will make the process smoother and far less overwhelming, especially when you organize your kitchen by zones.
Organization and cleaning go hand in hand. If staying on top of messes is a struggle, these 24 Ways to Keep a Kitchen Clean when Life Gets Messy pair perfectly with this chart.
If you would rather jump right in, that is totally fine too, but these quick prep steps will set you up for success.
Here are a few things to do before you begin:
- Set aside enough time for your kitchen organization project. Depending on the current state of your kitchen, this may take several hours or be spread out over multiple days.
- Give yourself permission to finish over more than one day. A fully organized kitchen does not need to happen all at once.
- Place garbage bags, a recycling bin, and a donation box nearby so you can quickly remove items you no longer need.
- Gather your cleaning supplies so you can wipe down cabinets, drawers, and shelves as you go.
- Define your goal before you start. For example, your goal might be to create a more functional kitchen where everything has a designated place. This may involve moving items to different cabinets or drawers to improve flow and usability.
- Start well-rested and with a positive mindset. Organizing is much easier when you’re not rushed, tired, or feeling pressured.
- Remember, the goal is not to keep everything or leave items where they are currently placed. Be open to change, make adjustments as you go, and monitor your progress throughout the process.
- Work through one category or zone at a time and complete it before moving on. Focusing on one area helps prevent burnout and keeps the project manageable.
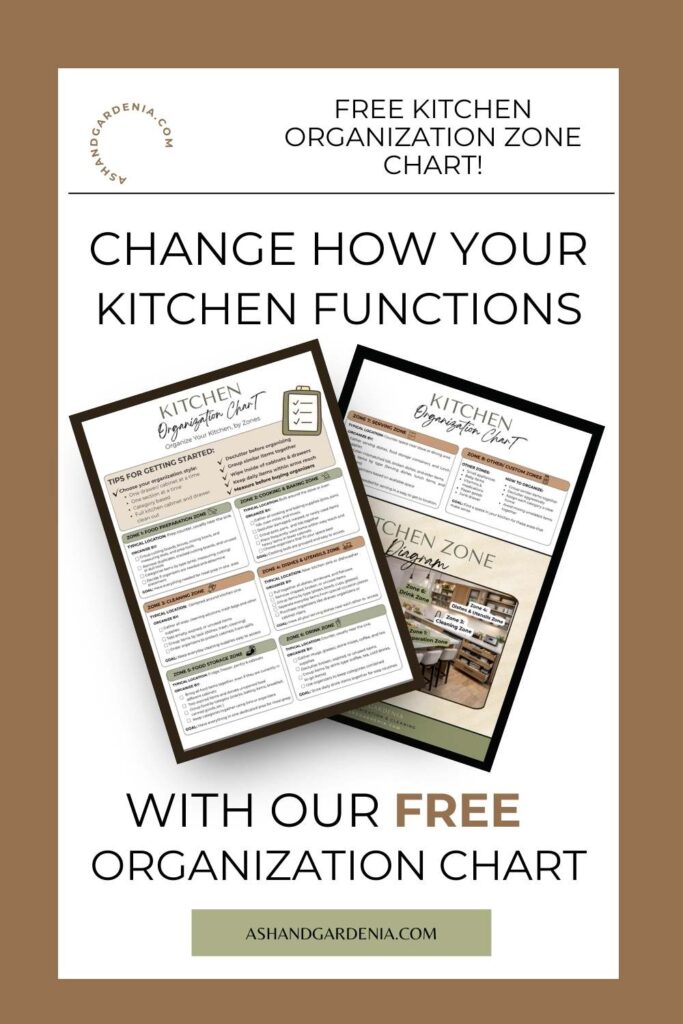
Get your free printable kitchen organization chart here!
Tip: Save or print this kitchen organization chart so you can reference it as you organize each zone.
Now that you’re prepared, let’s walk through the different strategies for organizing your kitchen so you can choose what works best for you.
Strategies for Organizing Your Kitchen by Zones
There is no single right way to organize your kitchen, especially when using a kitchen zones organization approach that can be adapted to different routines and kitchen layouts. The best approach is one that matches how your brain works and how much visual clutter you can handle at a time.
If you don’t have a preferred organizational style, decide on one of the strategies below that feels realistic for you. While many organizing guides recommend taking everything out at once, that approach can feel chaotic and overwhelming for some people.
Ways to Organize with the Kitchen Organization Chart
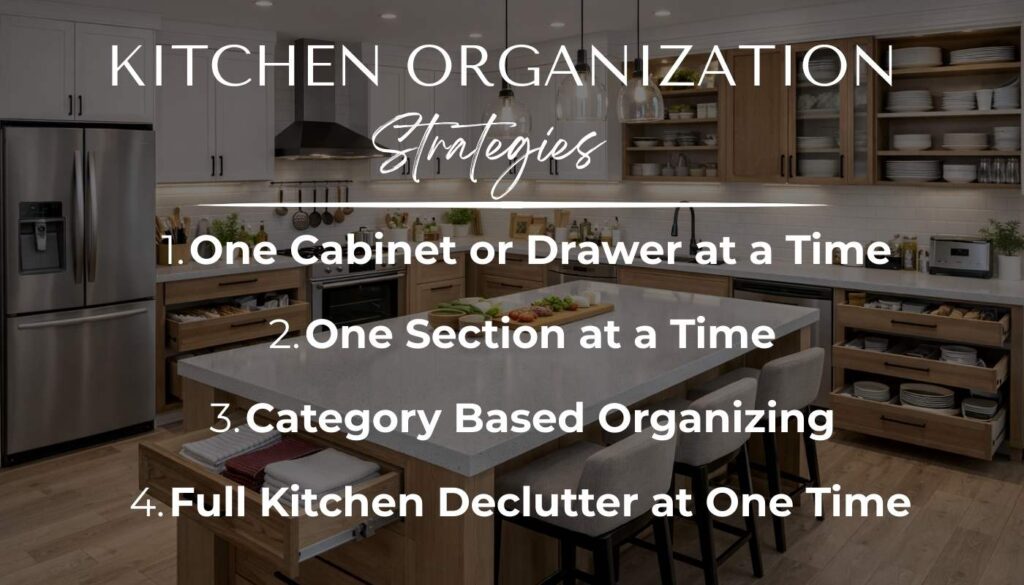
Strategy 1: One Cabinet or Drawer at a Time
Start with one cabinet, one drawer, or a small space. Remove everything, declutter items you no longer use, group similar items together, and clean the space. Measure the area if you plan to add organizers and write the measurements down. Put items back once you are finished, or leave them out if you think they may work better in a different location.
This strategy works best for someone who prefers to work slowly, wants steady progress, and feels overwhelmed by too much visual clutter at once.
Strategy 2: One Section at a Time
Select a full section of the kitchen, such as the pantry, utensil drawers, or dish cabinets. Remove everything from that section, declutter, categorize, remove items that don’t belong, clean the space, and measure for organizers. Return items to the same area or label them to be moved to a better zone.
This approach is perfect for someone who likes seeing progress in one noticeable area before moving on.
Strategy 3: Category-Based Organizing
Instead of organizing by location, gather similar items from around the kitchen into one place. For example, collect all baking items, food storage containers, or cooking utensils. Declutter, reorganize by category, decide on the best space for each group, clean the space, and then start putting items away.
This strategy works best for kitchens that have grown messy over time and where items are scattered throughout the space.
Strategy 4: Full Kitchen Declutter at One Time
Remove everything from every drawer and cabinet and place items on the countertops or kitchen table. Declutter, categorize, and clean all spaces; remove what doesn’t belong, then rebuild the kitchen from scratch.
This method works well for people who can handle visual clutter, stay focused with everything out, and know they can finish the project in one day. If you have limited counter space or know that visual clutter stresses you out, this strategy may not be the best fit.
Side Note: Personally, I cannot handle too much visual clutter at a time. My brain gets overwhelmed quickly.
Choose the strategy that feels doable. The goal is a completed kitchen, so if a slower method or working section by section over several days works better for you, there’s no reason to feel guilty about that.
Now that you’ve chosen your organizing strategy, use the kitchen organization chart below to work through your kitchen zone by zone.
The kitchen organization chart below is designed to be saved or printed so you can reference it as you organize each zone.
Get your free printable kitchen organization chart here!
What Are Kitchen Zones?
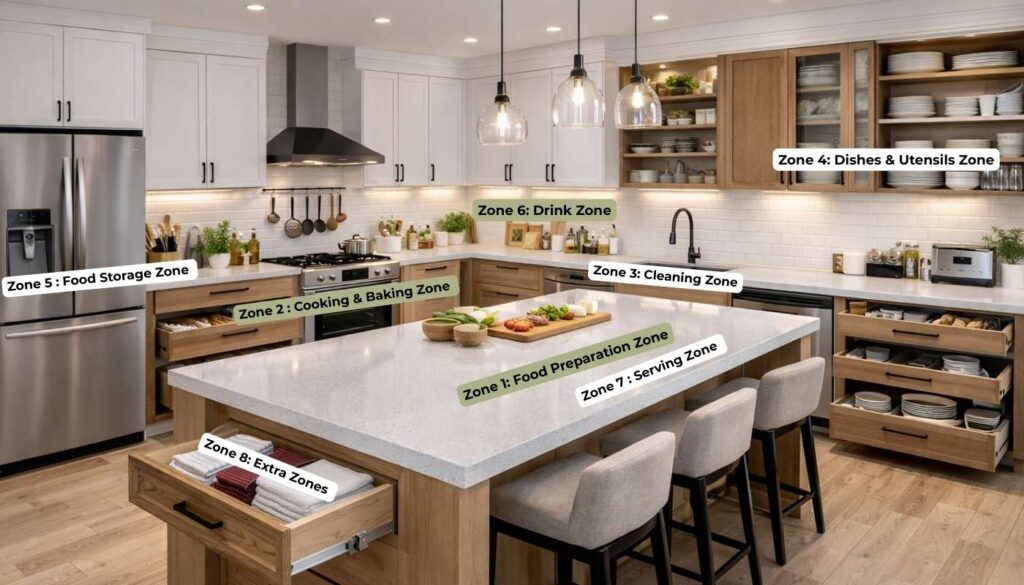
Kitchen zones are specific areas of the kitchen that focus on a single function. Organizing by zones makes it easier to group similar items together, create logical storage, and maintain organization long-term.
If you’d like a deeper breakdown of how kitchen zones work, check out my post, Where to Put Things in Kitchen Cabinets and Drawers by Zones, where I explain each zone in detail.
As home organization experts at The Spruce explain, categorizing and grouping items by task makes kitchens easier to use every day.
Kitchen Organization Chart by Zones
This chart focuses on what to organize and how to group items; you’ll determine placement of items based on your kitchen layout.
Zone 1: Food Preparation Zone
Location: Prep counter, usually near the sink.
Organize By:
- Group cutting boards, knives, mixing bowls, measuring tools, and prep tools
- Remove duplicates, cracked cutting boards, and unused or dull tools
- Categorize items by type
- Decide if organizers are needed and determine placement
Goal:
Have everything needed for meal prep in one dedicated area.
Zone 2: Cooking & Baking Zone
Location: Around the stove or oven.
Organize BY:
- Gather pots, pans, lids, cooking utensils, bakeware, oven mitts, and trivets
- Declutter damaged, warped, or rarely used items.
- Group pots, pans, and lids together (store lids vertically)
- Place frequently used items within easy reach and heavy items in lower cabinets.
- Choose organizers that work best for your space
Goal:
Cooking tools are grouped and easy to access.
If pots and pans always feel tricky to store, this guide covers 18 organization ideas and helps you choose the best setup.
Zone 3: Cleaning Zone
Location: Centered around the kitchen sink.
Organize By:
- Gather all soap, sponges, dishwasher pods, cleaning solutions, and gloves.
- Toss empty, expired, or unused items.
- Group items by task (dishes, trash, cleaning)
- Store items by category, usually under the sink
- Order organizers to protect cabinets from spills
GOAL:
Keep everyday cleaning supplies easy to access.
Zone 4: Dishes & Utensils Zone
Location: Near sink or dishwasher
Organize By:
- Group everyday dishes, drinkware, flatware, and serving utensils.
- Remove chipped, broken, or unused items
- Group items by type (plates, bowls, cups, glasses)
- Keep daily-use items in arm’s reach and special items farther away.
- Purchase organizers like drawer organizers or cabinet risers.
Goal:
Store serving dishes and utensils together for easy access.
Zone 5: Food Storage Zone
Location: pantry, cabinets, fridge, and freezer.
Organize By:
- Pull all food items together, even from different areas
- Toss expired food and donate unopened non-perishable food items
- Group food by category (snacks, baking items, breakfast, canned goods, etc.)
- Keep categories together using bins or organizers
Goal:
Make food easy to see, access, and maintain by category.
If your pantry feels chaotic, these 30 brilliant kitchen pantry organizing ideas dive deeper into storage solutions and layouts.
Zone 6: Drink Zone
Typical Location: Counter area, usually near the sink.
Organize By:
- Gather mugs, glasses, drink mixes, coffee, and tea supplies
- Declutter broken, expired, or unused items.
- Group items by drink type (coffee, tea, cold drinks, to-go items)
- Use organizers to keep categories contained
Goal:
Store daily drink items together to support easy routines.
Zone 7: Serving Zone
Location: Counter space near stove or dining area.
Organize By:
- Gather serving dishes, food storage containers, and lunch supplies
- Declutter mismatched lids, broken dishes, and older items.
- Group items by type (serving dishes, lunch items, and containers).
- Choose organizers based on available space
Goal:
Have everything needed for serving and leftovers in one easy-to-access location.
Zone 8: Other/Custom Zones
Location: Anywhere that fits your routine.
OTHER ZONES
- Small appliances (usually not needed daily can be stored away)
- Baby items
- Vitamins & medications
- Paper goods
- Junk drawer
How to Organize Custom Zones
- Group similar items together
- Declutter aggressively
- Assign each category a clear home
- Avoid mixing unrelated items
Once your zones are set, the right organizers make all the difference. These pretty kitchen organization ideas help your systems look as good as they function. Make sure you measure the space to see if they fit.
I hope you enjoyed this kitchen organization chart and tips. If you didn’t get the free chart above, you can access it below by clicking the kitchen organization chart.