How to Declutter and Organize Your Pantry Using Pantry Categories
The kitchen pantry has a way of collecting clutter, no matter how often we try to keep it organized. Items get misplaced, duplicates are purchased, there are no pantry categories, and suddenly, it’s hard to find what you need when you need it. Does this sound familiar? I get it, life is so darn busy, and decluttering and organizing the kitchen pantry rarely makes it to the top of the to-do list.
But here’s the thing, when your pantry is clean and well-organized, it becomes a game changer for your home. It frees up valuable space in your kitchen cabinets and drawers, makes your entire kitchen feel more spacious and saves you time on busy days. One of the most effective ways to bring order to your pantry is to use pantry categories. Categorizing your items not only makes everything easier to find, it turns your pantry into a functional, efficient space that works for you, not against you.
Ready to take control of your pantry? I’m going to teach you a step-by-step process of how to declutter and organize your pantry using pantry categories that will transform your pantry.
Disorganized Pantries Don’t Have Pantry Categories
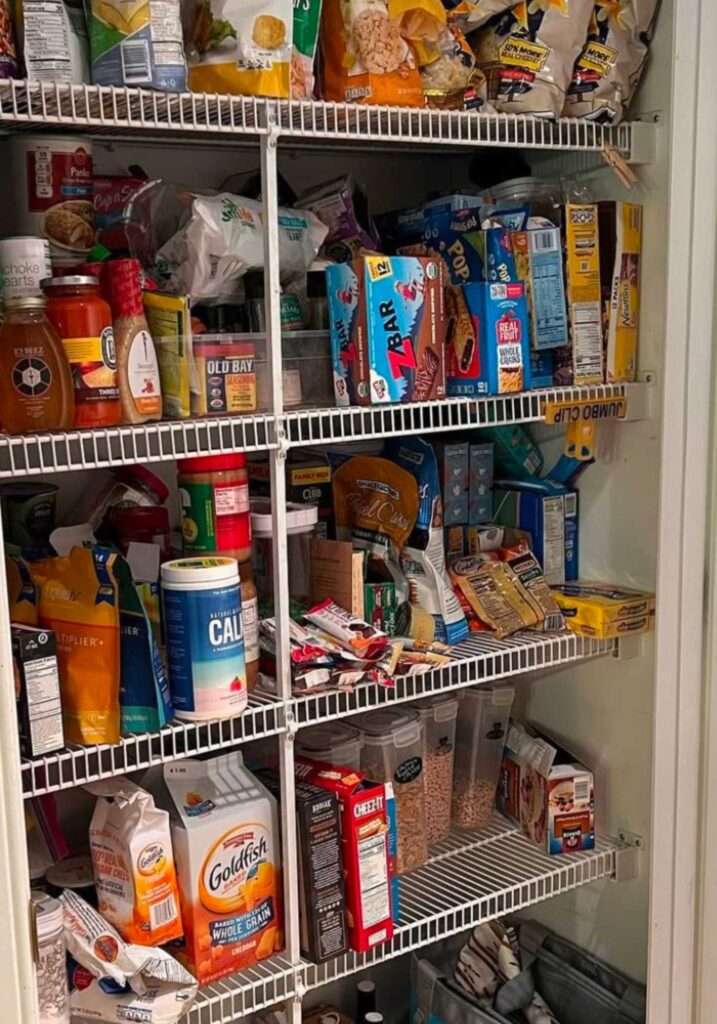
Disorganized pantries often lack a clear system of pantry categories and use little to no organizational products to keep everything grouped. As a result, these pantries tend to feel chaotic, cluttered, and stressful, making kitchen tasks such as cooking feel overwhelming.
A well-organized pantry, on the other hand, creates a sense of calm and ease. It makes daily tasks like cooking feel easier and much more manageable. Pantry items are easily found, duplicates aren’t bought, and meals come together with less stress. Doesn’t this pantry sound amazing?
Declutter and Organizing Timeline
Decluttering your pantry doesn’t have to take all day. It’s a process that should take a few hours rather than days. The key is to stay focused and make quick decisions about what stays and what goes.
Finishing the organization might take another day or two, especially if you’re ordering pantry organizers and creating labels. Organizers likes bins, lazy susans, jars, and plastic containers, help create a visually appealing space while keeping everything in its place.
Here is a simple schedule to declutter your pantry:
- Day 1: Declutter, organize pantry into categories, & measure for Organizers
- Day 2: Research pantry organizers & purchase organizers
- Day 3: Unpack organizers, place items in or on organizer, & label
Steps to Declutter and Organize Your Pantry
1. Remove Everything from Your Pantry
Clearing out the pantry is an important first step in the decluttering process. Starting with an empty, clean space will make organizing much easier. Plus, the shelves and drawers will most likely need a thorough wipe down if they haven’t been cleaned in a while.
2. Clean Shelves, Drawers, and Surfaces
If you haven’t cleaned your pantries shelves, drawers, and surfaces in a while, now is the time. Especially, if you see dust, crumbs, and food items all over them. Don’t skip this step, you’ll want a fresh, clean surface before you start organizing and putting items back. It’s silly to put organized items on dirty surfaces.
3. Purge Like Crazy
Like I said earlier, pantries tend to accumulate so many items because we tend to store things and forget them. It’s also one of the bigger storage spaces in the kitchen, so it becomes a catch-all for extras, backups, and forgotten items.
Now’s the time to start sorting and getting rid of everything that is expired, stale, or not going to be used. Found stale cookies? Expired cans of beans? Old kitchen appliances you never use? Cereal that has been unopened for months? Get rid of it all.
Be absolutely ruthless and don’t feel guilty about getting rid of items. If you’re struggling to decide whether to keep an item, that’s usually a sign it’s time to part with it. Often, when we have to really think about how or when we’ll use something, we’re just trying to justify keeping it. We’ve all been there, saying things like, “Maybe I’ll use this almond flour before it expires next week.” But the truth is, if it hasn’t been used yet, it probably won’t be. Let it go! Your neat and organized pantry will thank you.
4. Sort Items Into Pantry Categories
Step four is to sort your pantry items into categories. Pantry categories are designated areas where you group like items together, making them easy to find to manage, and take inventory of.
It would be silly to mix your baking goods with snacks or your canned goods with oils. By categorizing your pantry items, you make it easier to access what you need.
It’s also important to customize your pantry categories based on what you store. For example, if you don’t have baking supplies in your pantry, there is no need to create a baking category for that. Your pantry should reflect your needs and household routines.
As you sort items into pantry categories, use sticky notes to mark each category. This helps you visualize the layout, adjust as needed, and stay organized before committing to permeant label names.
Here’s a List of Common Pantry Categories
- Breakfast Items: Make a space for your go-to breakfast essentials such as oatmeal, cereal, pancake mix, granola, and breakfast bars. This will make mornings smoother and easier as you’re rushing to work or school.
- Condiments: Designate a zone for condiments such as ketchup, mustard, mayonnaise, hot sauce, salad dressings, and marinades. Store them in a bin or on a lazy Susan to keep things organized and accessible.
- Pasta & Grains: Group pasta and grains together like rice, quinoa, pasta, and rice. To maximize freshness and space, store these items in airtight containers or clear bins.
- Canned Goods: You can place canned goods at eye level or slightly lower, where they’re easy to grab for cooking. Consider organizing them by type, such as vegetables, beans, and soups.
- Baking Goods: For all your baking essentials, create a designated space for flour, sugar, baking powder, chocolate chips, and other ingredients. With everything together, you’ll be able to find everything right away when ready to bake.
- Daily Medicine & Supplements: Group your daily medicine and supplements in one spot. Consider using bins or a lazy susan to keep everything organized and easily accessible.
- Liquids & Oils: Create a zone for cooking oils, vinegar, olive oil, sauces, broths, and other bottled liquids. Put them on an organizer such as lazy susan, tray, or in a drawer organizer to make it easier to grab what you need.
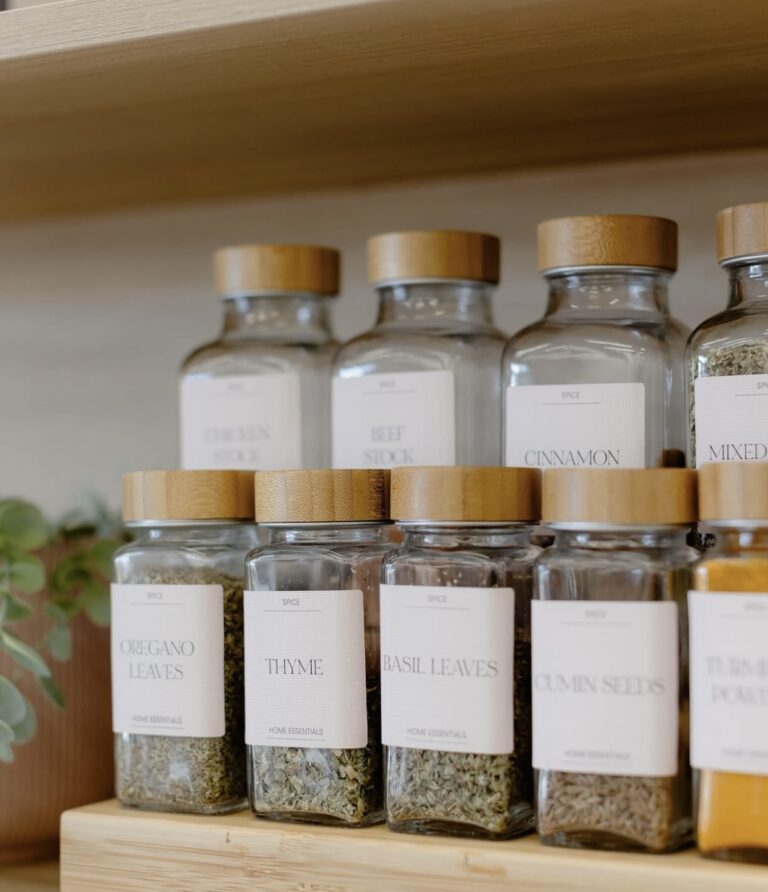
- Herbs & Spices: Spices should be grouped together to keep them organized and easy to access. Use a spice rack, a lazy susan, or a drawer organizer for a quick way to find exactly what you’re looking for when you’re cooking.
- Snacks: Create a grab and go snack zone with bins or baskets for chips, granola bars, pretzels, and other snacks that come in individual packets. If you have snacks that come in large boxes, you can store them in plastic containers with labels on them.
- Paper & Plastic Items: Often overlooked, paper and plastic goods are a common pantry item. Group together items like plastic silverware, paper plates, paper towels, and plastic bags.
- Kitchen Appliances: If you store kitchen appliances in your pantry, dedicate a shelf or cabinet space to them.
- Back Stock & Rarely Used Items: Store rarely used items like specialty ingredients, holiday treats, or extra pantry stock in harder to reach places like top shelves or hard to reach corners.
Step 5: Put Items Back Strategically
Now that you sorted and categorized everything, it’s time to start placing items back into your pantry. Don’t worry if you don’t have organizers yet! This step is about figuring what setup works best for your daily routine and space. Make sure you place your items in areas that make sense for your everyday routine.
Start by placing the most frequently used items in easy to reach areas. If you are a regular baker, keep baking essentials like flour, sugar, and baking powder in a prime spot you can access. On the contrary, if baking is a once a month task, you can store them on a higher shelf or least accessible place.
Love to snack? Create a grab and go snack section on a low shelf or in a drawer that’s easy to reach. This will especially be helpful if you have kids that like to get their snacks on their own. If your family eats breakfast at home regularly, keep breakfast essentials like cereal, oatmeal, and bars towards the front. The key is to really be strategic about how you organize your pantry to meet you and your families needs.
Step 6: Purchase Pantry Organizers
Organizers keep your pantry shelves neat, ingredients visible, and everything in its proper place. Without a system in place that utilizes pantry organizers, your pantry can become super messy again. With the right organizers, you create a structure that makes it easy to return items to their proper spot every time and helps you maintain a clean, orderly pantry every day.
Pro Tip: Make sure you measure your pantry shelves to determine what size organizers to buy. Choosing the right size organizers ahead of time will save you time and energy and will help you maximize every inch of your pantry.
Popular Pantry Organizers Include:
- Clear Storage Bins: For easy visibility and quick access
- Decorative Storage Bins: Combines function with style
- Airtight Containers: Keeps dry goods fresh longer
- Tiered Shelves: Maximizes vertical space for cans and jars
- Lazy Susan’s: Perfect for condiments, oils, and spices.
- Drawer Organizers: Help you sort smaller items
- Over the Door Racks: Adds more storage room
- Labels: Makes everything easy to find
If you want to see more examples of different pantry organizer ideas, take a peek at my post called 30 Brilliant Kitchen Pantry Organizing Ideas for Every Home.
Step 7. Place Pantry Items in Organizers & Add Labels
Once your organizers arrive, start by placing them in your pantry to see if they fit well and work well together visually. Take a moment to rearrange as needed to optimize space and accessibility. If you love the look and function and don’t intend to return them, then place your pantry items into their designated organizers.
This is also the perfect time to add labels to keep everything clearly identified. Whether you are labeling snacks, basking essentials, breakfast items, this step makes it easier to maintain order long term. You can use pre-printed labels, make your own, use chalkboard stickers, or use a label maker.
Examples of How Pantry Categories are Used In Various Size Pantries
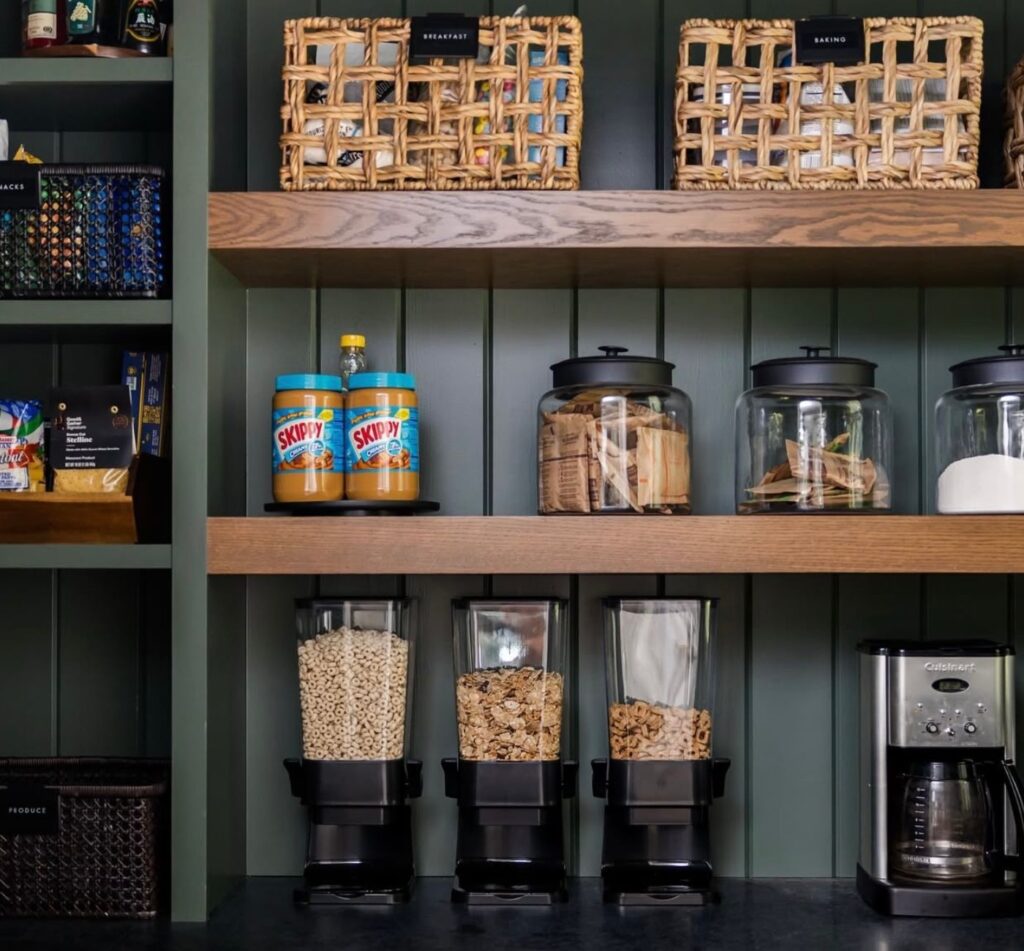
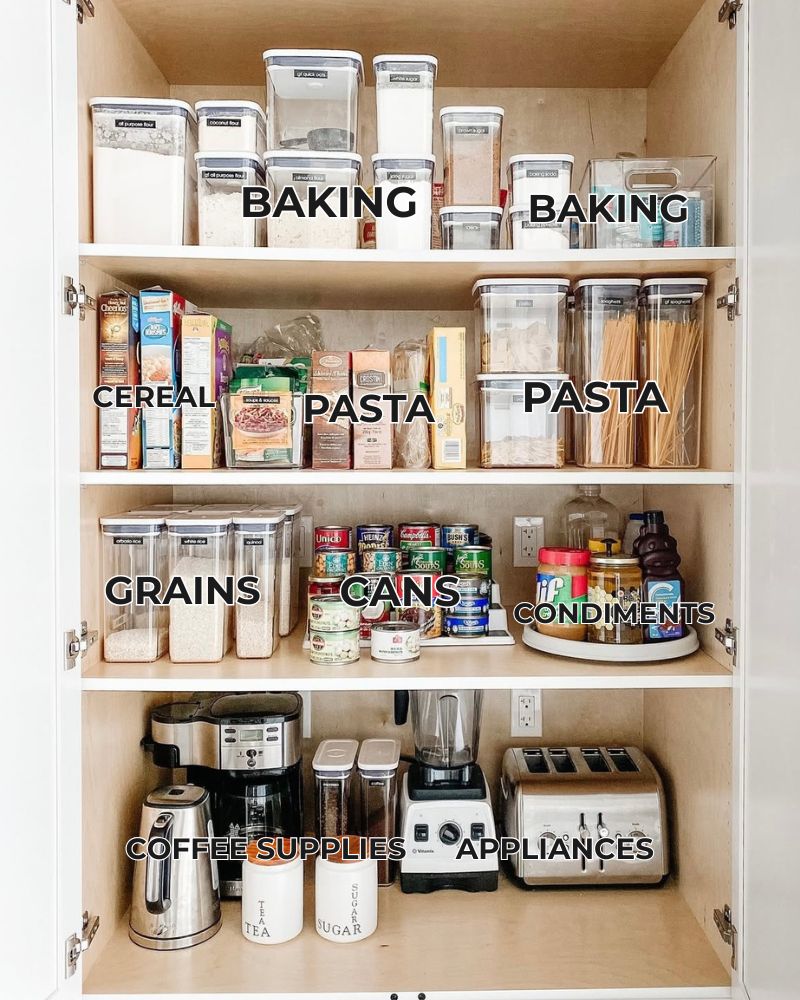
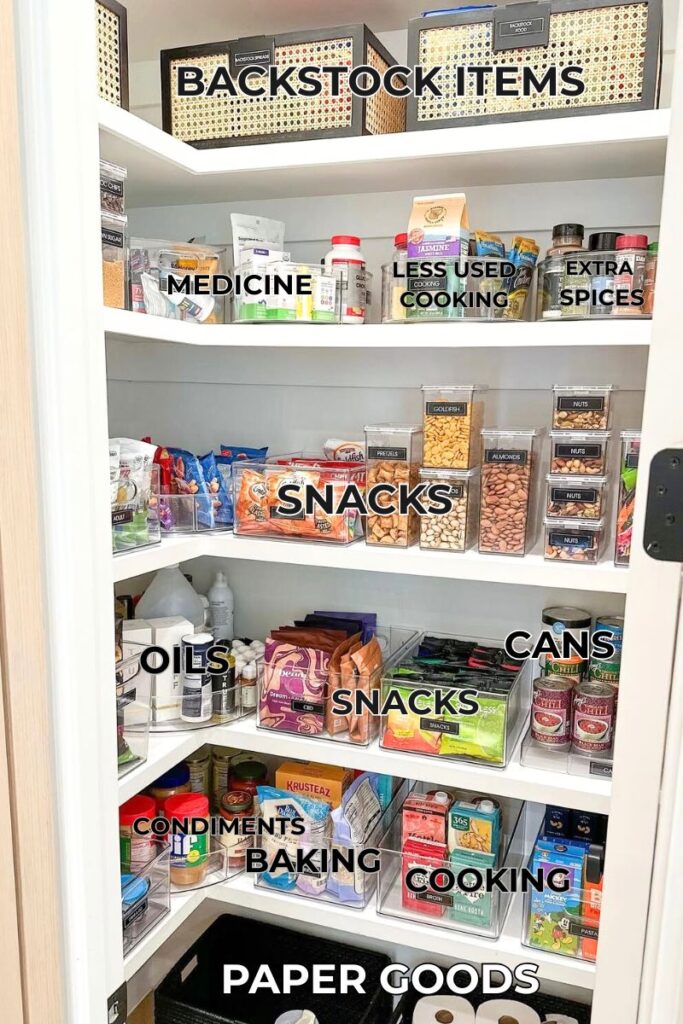
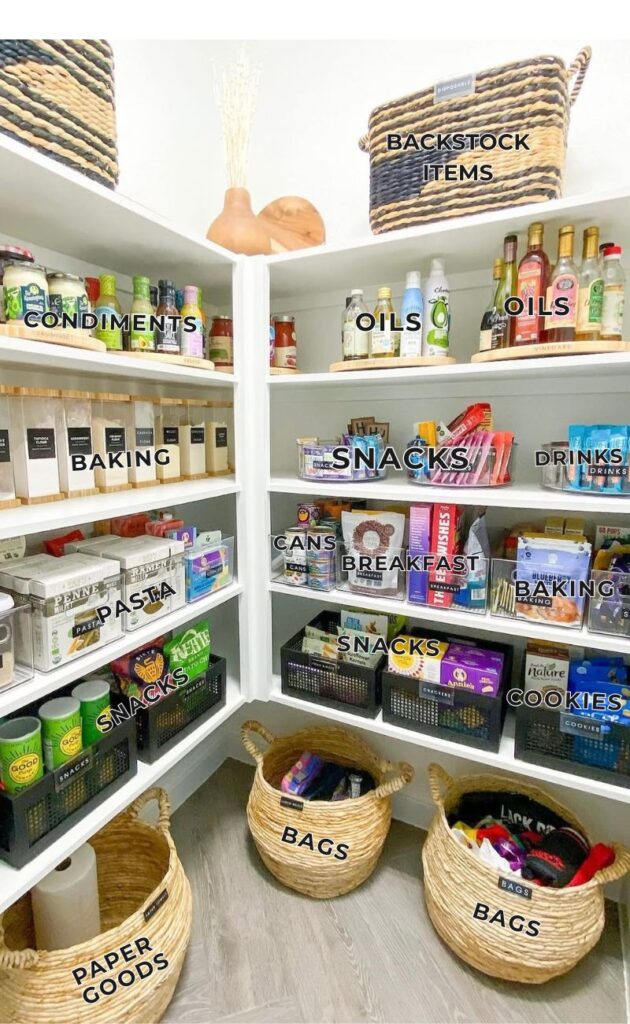
Take a look at these examples below that show how pantry categories can be used effectively in pantries of various sizes. These photos show how grouping similar items such as grains, snacks, canned goods, breakfast items into clearly labeled organizers helps create a highly organized pantry.
Whether the pantry is a large walk in or small cabinet, you’ll notice the same theme, items are categorized and stored together in bins, baskets, or containers. This makes things easier to find and helps maintain order over time. I also love how visual appealing it is to see items grouped in categories. .
EXTRA SMALL PANTRY

Small Pantry
MEDIUM PANTRY
LARGE PANTRY
Conclusion
Using pantry categories is one of the most effective ways to keep your space organized and functional. By grouping like items together, like snacks, breakfast items, grains, and baking goods, you create a system that’s not only easy to maintain but easy to navigate.
Whether your pantry is large or small, clear categories bring order to every size pantry. They also help create order to chaos and make certain that everything has a home.
I hope this post has inspired you to create the organized pantry of your dreams. Trust me! Pantry categories are truly a game changer!
Check out my other related posts below for more pantry organization tips, and product recommendations.